ShareThis

Showing posts with label Crafty. Show all posts

Monday, April 9, 2012

Make a purse a camera bag. Do it!

I got my dream camera shortly before Christmas. For Christmas, my sis gave me a camera bag. It has served me quite well. No broken cameras here, thank you very much.

But yesterday, I ordered a new lens, and the current bag won’t have room for both. I’ve been planning for this. Who gets a dslr and keeps the kit lens?  Not this gal!

Anyway, bags ain’t cheap, so I started researching. I pinned this blog post. She fitted a purse out with pads to create a cute, stylish, not boring black camera bag. 

You’ve figured out by now that I think I can make anything, right? Well, most of the time, I can. I do a trial and error thing that probably takes twice as long, but gets it done.

Ok.  To the photos.

_DSC0707

I started out trying to sew the velcro onto the fabric, but my machine was stubborn. So next best thing. Glue gun!

Except you sometimes burn your fingers._DSC0714

When that happens, you put toothpaste on them to remove the pain.  Let it sit for an hour or two, it really helps. Sounds weird, I know. Just trust me.

I made 3 pads for the bag, and 4 pads that I can switch around to fit lenses, camera, and other goodies.

_DSC0750

See how the pads are velcroed in? I can change them around. I made an extra one too.

Here are my fingers the next day. Blistered like crazy, but not hurting._DSC0754

Healing nicely, thank you. I’ve never had a burn from a glue gun that bad before.

Oh.  Here’s a pic of my camera in my bag. I’m so excited about it!!!purse

The only down side, I look like I’m carrying two purses. I’ll have to throw my wallet and phone in here when I don’t want to look like a crazy bag lady.

I just wanted to show off my new duds, not really do a tutorial. I thought about it, but kept forgetting to get photos of every step.

I used 1/2 inch foam that I got from Hobby Lobby, and two different fabrics that I got from Wal Mart.  Yes, ours still sells fabric. 

Full disclosure: this is another blog post that I’ll be pinning from.  Just so you know!

You making anything fun? Do share!

Monday, December 12, 2011

Pinspiring

That’s a little misleading.  I wasn’t necessarily inspired by a pin.  I did keep up with the photo searches I did for inspiration with Pinterest. 

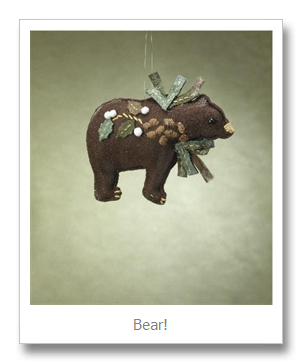
Anywho.  Here’s what I wanted.  Every year Davy gets a bear ornament, Liv gets a mouse ornament, and Gabe gets a reindeer.  Sometimes, it’s difficult and expensive to find good ornaments.  I decided to make them this year. 

So the search began.  Thank you very much Google Images.

Ok.  So that’s what I’m copying.  Here’s what I made.

I’m so proud.  They’re so cute!  Dave LAUGHED at me for being so excited about my work.  Laughed! 

It was fun making them, but even more fun carrying on a tradition that we’ve had all of their lives. 

Oh.  And you better believe these are going on Pinterest. 

(Is it terribly sad that you blog only to have somewhere to pin your work from?) 

Friday, November 11, 2011

Earrings 11

I have been wanting to make these earrings for YEARS.  I remember exactly when my obsession started.  It was with the following scene in Oceans’ 11.

I couldn’t pay attention to the story, I was so engrossed in those earrings.  It was love at first sight.

So I looked online.  Surely you can find something similar, I naively thought.  You can’t.  Even now, years later.  Go ahead, try.  I dare you.

So I began looking for pieces to put together.

Here’s what I started with.

I realize that my studs are a bit pidly compared to the originals, but I had to work with what I could find.  And I lengthened them, too.  Creative License and all that. 

I’m really pleased with them. 

Oh.  Please forgive my pasty paleness.  I’ve been hacking up lungs for the past week. 

You got anything you’re working on?

Tuesday, May 24, 2011

Phenomenal Gift-giving on a Less-Than-Phenomenal Budget

ultimate-blog-swap

Today I’m participating in the Ultimate Blog Swap. You’ll find me posting over at  Infinite Learners about When a Mommy Blogger becomes a Mom Blogger, and I’m excited to welcome Kathirynne from Evolution to Simplicity to PJs Til Noon!


Gift giving can be a highly stressful proposition.  We want the gift to express our feelings for the recipient, we want it to be appreciated, and we don't want to break the bank paying for it.  Implementing the steps below will make your gift giving easier, more heartfelt and thoughtful and (I hope) less expensive.


1) Plan Ahead It's one thing to be caught off guard by an unexpected baby shower or a wedding invitation that arrives out of the blue and have to engage in some quick thinking to come up with a suitable gift.  But Christmas, Valentine's Day and our loved ones' birthdays occur on the same day every year, which makes for easy planning.  Mother's Day, Father's Day and Easter, while not on exactly the same date every year, annually occur at the same time of year, so they are no surprise, either. 
The time to start thinking about Christmas, for instance, is NOT the day after Thanksgiving.  Anyone can purchase something from a "big box store" on Black Friday.  But to create truly meaningful gifts requires forethought and advance planning.  The Victorians traditionally began their Christmas preparations as early as July to ensure that they would be finished in time to be placed under the tree on Christmas Eve.  It may feel silly to be "making a list and checking it twice" while the scent of Independence Day fireworks still lingers in the air, but when you're finished with your holiday shopping well before Thanksgiving (while everyone around you is frantically scouring the shops for that "perfect gift") you'll be glad that you planned so far in advance.


2) Know Your Intended Recipient  With very few exceptions (our children's teachers, for instance), the people to whom we give gifts are people we know well.  If this is not the case, perhaps the question to be asking ourselves is not "What gift shall I give to this person?" but rather "Why do I feel obligated to give this person a gift at all?"
Once you have established that a particular person does, indeed, belong on your gift list, it's time to brainstorm.  The best gifts are ones that have been selected with the specific recipient in mind.  Consider your intended recipient's likes and dislikes, their interests and hobbies, even their allergies and dietary restrictions, if applicable. 
For instance, your friend the chai tea lover who has a long commute to work every day might enjoy a reusable travel mug, a chai tea recipe and all the necessary ingredients to make her favorite beverage at home.  Not only will she appreciate this gift when she opens it, but also every time she doesn't have to fork over $4.50 at Starbuck's for her daily chai fix.


3) Set (and Stick to) a Budget This is probably the least fun component of gift giving, but it is probably the most important one.  Giving gifts that are beyond our financial means is irresponsible and unnecessary.  Planning and creativity usually trump a large outlay of cash when it comes to gift giving, so set your budget boundaries and stay within them.  (In order to avoid "the gift that keeps on taking" pay with cash instead of with a credit card...those interest charges add up.)


4) Get Creative  This is where the fun really begins.  A good gift is like a collage - a bit from this source, a bit from that source - all combined to create a masterpiece that is more than the sum of its parts.  Decide on a theme to use as a springboard.  Does your friend enjoy sushi?  Perhaps a “Make-at-home Sushi Kit”might be a good gift.  Has your niece expressed a sudden interest in knitting?  A knitting bag containing needles, yarn and a gift certificate for classes at a local yarn shop (or, if you know how to knit, lessons from you would be even better) would make the perfect present for her.


Think beyond the usual sources when seeking out the components of your gift.  That vintage coffee can from the antique shop can become a quaint container for a gently used coffee mug from the thrift store, a sack of fancy coffee from the gourmet grocery, and a selection of biscotti baked in your own kitchen to create a gift that your favorite coffee lover will be thrilled to receive.  A stack of books (by a favorite author or about a specific topic of interest) from the second-hand bookshop, a simple handmade bookmark or two and a clip-on booklight from the office supply store combine to become a fantastic present for that bookworm in your life.


The gifts we give are tiny reflections of ourselves.  Be sure the gifts you give say that you are thoughtful, creative and thrifty but not cheap.


~Jen here.  I for one LOVE the tips in this post! 

What do you think?  You have tips to add, and what’s the best gift you’ve ever given?  Or received? 

(I’ll take whatever you want to throw our comment way!)

ps.  Visit Life...Your Way to see all of the Ultimate Blog Swap participants!

Monday, May 9, 2011

Face Painting Tips

024
Now, the above pic may not look super professional, but it is better than your average bear.  I mean jungle cat.  Whatever.
I watched a pro do the face painting at a kids’ event last year and I brought home a tip or two or ten.

#1.  Cosmetic sponges.  I used the cheap, triangle ones.  These are essential for blending.  Don’t cake that stuff on your kid’s face.  It will crack and be uncomfortable.  Plus, it saves your stock.  So that you can have more face paint fun later on.  With or without children.  {wink}

#2.  You don’t have to be exact with your color.  Just blend on a good size blob of color, then use the black or darker colors to make your butterfly, kitty face, spiderman mask, whatever. 

#3.  Use your makeup.  I tested this look on myself the night before Missy Moo’s Cheetah project presentation (the reason for the face) and discovered that the black face paint stings the eye.  Not in the eye, though I imagine that would be less than comfortable.  The delicate skin around the eye.  So we used black liquid eyeliner for her eyes and the tiny whisker dots above her lip.

#4.  Use help.  There are many sites out there to help you get the look you want.  This one has instructions, but limited designs.  I just used Google images and combined elements I liked from several, along with looking at an actual Cheetah to get it close.  Well, as close as a human face could get with limited funds/talent/time.

#5.  Practice.  We practiced the night before, so I knew what I did want and did not want to do, and about how long it would take.  When playing beat the bus, you need an idea of how long this will be.

#6.  BLOT.  This is essential.  Otherwise you’ll have smears.  I found this out as I dropped her off.  (And I lost that game of beat the bus.  Thanks for asking.)  I used clean makeup sponges to blot the eyeliner so it wouldn’t transfer to her eyelid.  I forgot to blot the dots.  Grr…

#7.  Powder is your friend.  After you’ve blotted, of course.  Unless you want black face paint on your powder brush and tiny streaks on your face.  If so, rock on my friend.  Set the whole look with a quick brush of powder.

#8.  I would even invest in a few different size brushes.  The cheapie that came with the face paint was ok, but a bit big.  I’d have liked the lines to have been smaller.

#9.  Work on a sleeping child.  I can’t tell you the number of times I said “STOP MOVING!”  I think sitting would have helped, too.  Funny how you come up with so many great ideas after it’s over, right?

#10.  Cheat.  You could just scribble “CHETTAH” on the kid’s forehead and be done with it.  Let people hone that wonderful imagine everyone keeps yammering on about.

So there you have it.  I know.  You’re dying to see me in cat, right?  Well you don’t have to twist my arm so hard. 
Here.
.Snapshot_20110503_8
Don’t you love my cat face?  (Hubby did NOT appreciate my feline form.)

I linked up with Homebody’s Tuesday Tips and Tricks, The Stories of A 2 Z Tutorials & Tips Tuesday, as well as OH Amanda's Top Ten Tuesday.  Visit these sites for great ideas, or link up for yourself!

So, do you have any face painting tips to add? 

Sunday, January 31, 2010

The one in which I brag on my teenage self

075

I like posting vintage pics every now and then. So, here you go.

I want you to look at that dress. This was taken in 1992. It was my junior prom. The dude, background, hair and corsage are all inconsequential. What I want you to study is The Dress.

Seriously, don’t look at the hair. I actually paid someone for that mess. I do want to point out that it is as if I got the memo about the photographer's background & planned accordingly.

Back to The Dress.

I still love this dress. I think it’s just lovely. It hangs in a closet at my mom’s house and my daughter pulls it out almost every time we are there to see if it fits her yet. Another side note. Look at that waist. It disappeared with the first baby and has been on the endangered watch list ever since. It’s been rumored to exist with certain lifestyle changes, but nobody’s seen it in at least 14 years.

Again. The Dress.

I saw a very similar dress that I really liked but it was $700. That’s a lot of coin to drop on a dress now, but then it was “I know better than to even ask Mom about it. Better not even mention it.”

So I did what any 16 year old would do.

I decided to make my own prom dress.

My mom and I drove about 45 minutes away to a gi-normous fabric store to pick out the pattern and fabric. That trip was so much fun. I still day dream about that store. I think that’s where my love for fabric took root. I had a serious liking before that, but that store cemented the relationship.

I turned my mother’s dining room into a tailor’s shop. Pattern pieces, fabric, notions, remnants and piles of dressmaker tools sat in that room for … well, I don’t know how long. The dress was actually slightly too big. If I took a deep breath, it fit. So I added the sequin spaghetti straps to make sure I had no wardrobe malfunctions. The trim on the hem(s), drop waist and bodice had to be sewn on by hand. That was the worst part of the whole process.

So there you have it folks. I have been a crafty, problem solving bird for quite some time. I’ve not been feeling too crafty here lately, so I’m reveling in my past exploits.

I adore this dress. If I could cram my post baby body into it, I totally would. Every single day. I’d wear it to the walmarts just to see if I become famous on the interweb.

As soon as I drop more than a few pounds, look for me in all of my taffeta, shiny turquoisey glory.